
So you're convinced that you want to start collecting rainwater at your house. Below you will find the resources to educate yourself on the best method for harvesting rainwater in your situation. You will also find information about the basic components of a rainwater collection system. Even though rainwater catchment is an old technology, there have been many improvements over time through product innovations.
The only thing that differs in the following methods is the scale of the system. They all follow the same principles but differ on aesthetics and actual water conservation effectiveness.
Rainwater harvesting as a primary water supply is a relatively new idea and industry. Therefore, the laws around rainwater harvesting can be a concern. As of right now, the federal government does not regulate rainwater harvesting at all, but rather, leaves it up to the individual state governments. Make sure that your rainwater harvesting trade contractor is aware of and complies with local codes and regulations.
In almost every case, it is not illegal to harvest rainwater. Rainwater is a resource, and once it falls on your property, it's yours.

Before installing your own system, please check to see if your area is suitable to harvest rainwater and be aware of your local laws or regulations on Rainwater Harvesting and available ground, spaces to install suitable systems.

The basic principles of rainwater harvesting are rather simple, catch rainwater, store it, use it. But there are components, details, and processes that are critical to the success of a rainwater harvesting system.
What do we mean by a successful system?
Rainwater harvesting as your main water supply should only bring benefits and improvement to your water, this includes:
Water quality: Based on purpose, the water should be clear, odorless, and taste great and needs to be bacteria-free through the use of a water disinfection system such as ultraviolet light or just simply clean, no dust, dirt, insects or any organic matter for non−potable uses.
Water pressure: The water should flow at the highest pressure possible without exceeding proper limits.
Water storage: The water being stored should be odor-free, slime-free, and clear.
System design: The system should be designed to meet the supply and demand of the home and its occupants. What is the sq. ft. roof surface that will be collecting rainwater? What is the average annual/monthly rainfall in the area? How much storage gives enough buffer to supply the house with ease, even with rain lapses?
These are 4 points that help in determining a successful rainwater harvesting system, but more aspects are involved even beyond these.

Before learning how to create a complete rainwater collection system, we need to learn about all available harvesting methods:
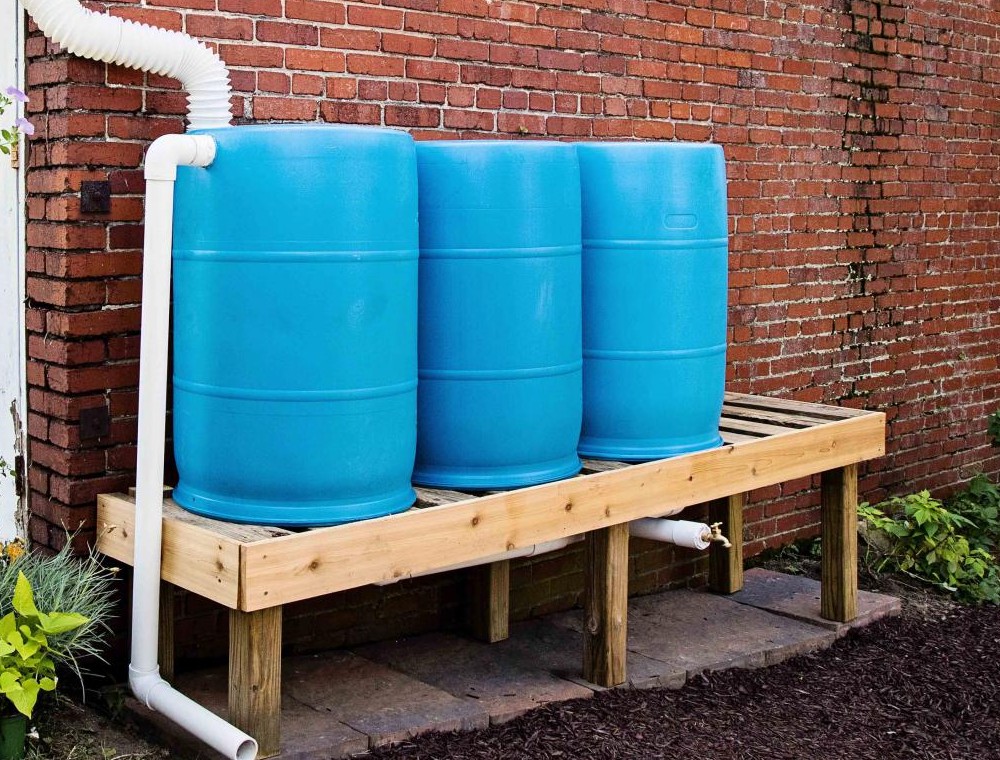
1. Rainwater Barrels: Barrel installation is the cheapest and easiest way to start harvesting rainwater in your home. A barrel is simply installed underneath the downspout of the guttering so that rain falling on the roof is funneled into the barrel.
Usually, the container will consist of a spigot under it to enable you to draw water and irrigate your garden. Better still, a hose can be connected to the spigot or to a drip irrigation system.
Barrels are advantageous because they can effortlessly be sourced whether recycled or new. If you opt for the recycled barrel, make a point to know exactly what the barrel was used for in order to be sure that no chemical residues remain inside. If you reside in a mosquito-infested area, make sure to include a lid for your barrel to mitigate the possibility of mosquitoes breeding in your barrel.
When winter month knocks, it is advisable to disconnect your barrel to prevent freezing and cracking. The major disadvantage of rainwater barrels is that they have a limited capacity; meaning prolonged rains would result in flooding. The barrels are easy to use and readily available for purchase at many locations, all at reasonable prices.
2. Dry System: This is a well-known method of rainwater harvesting. It's basically an improvement to the rainwater barrel technique in terms of size. A larger water storage container is situated just a few steps from the property. This container provides a much larger storage capacity compared to the barrel.
The gutter is then diverted to channel water into the tank. It's also easy to implement and relatively cheap. The name “dry” comes from the fact that the collection pipe dries up after any rainy day because it's meant to empty into the top of the tank. The dry system is ideal for areas with huge storms.
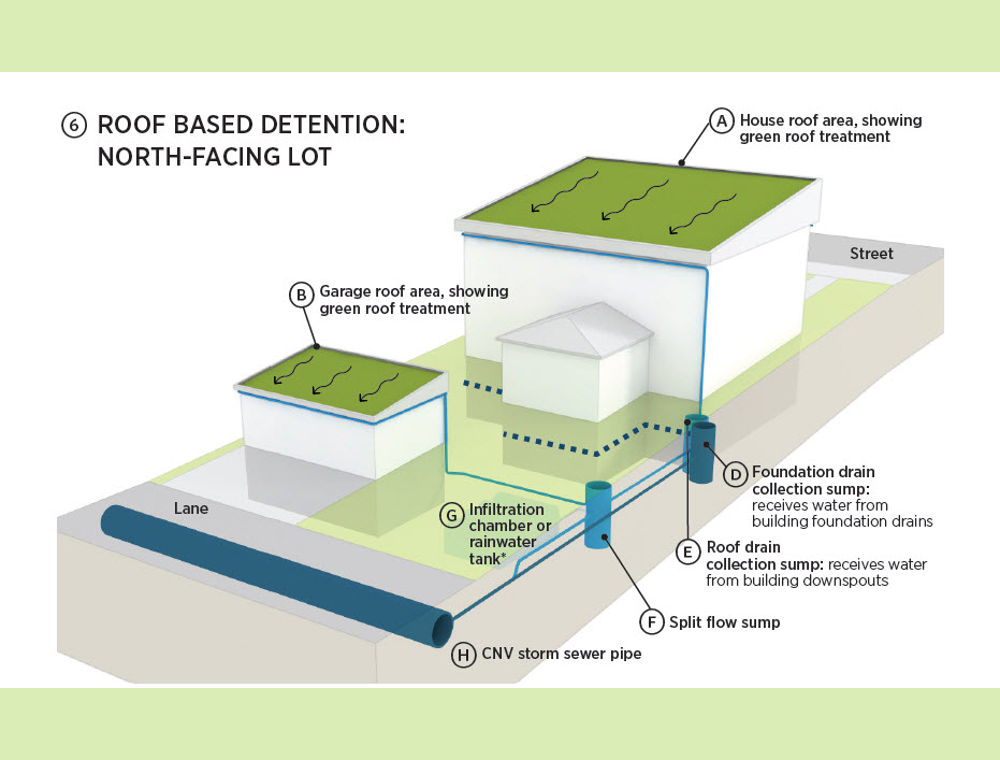
3. Wet System: The wet system is the exact opposite of the dry system. This is because the collection pipes are ever full of water since they are located underground. Here, numerous collection pipes are connected to multiple downspouts on the building and channeled to empty into the storage tank underground.

When there is no rain, the level stays constant, and the pipes are always full. Due to the ever availability of water inside the pipes, it is recommended that they be watertight to mitigate the possibility of leaking into the soil. The underground piping makes it relatively expensive to install compared to the dry and wet systems.
4. Green Roof: This method of rainwater harvesting literally cuts out the middleman. Instead of directing rainwater for storage in the tank and then channel it to the garden; you could install a green roof on your house to enable plants to use the water instantly. But you have to lay down a lining for your roof's protection and include a drainage system to take care of the runoffs.
Installing garden beds with plants that require low maintenance is the surefire way of maximizing your plot's productive space and leveraging the rainwater where it falls. Also, installing a green roof will add insulation to your house and cushion your roof from damage.
If you prefer you can create your own barrels for rainwater harvesting. Just a few components like the Catchment area, conveyance system, first rain separator, filter unit, storage, delivery system, usage, recharge, and supplies are needed to create your own barrel.
You will need to follow the instructions included with your rainwater harvesting kit to set things up and begin the collection of the rainwater. For a DIY job, there are many resources available to you on the internet at no charge. You can definitely take advantage of the information whenever you need to and create your own rainwater harvesting system.
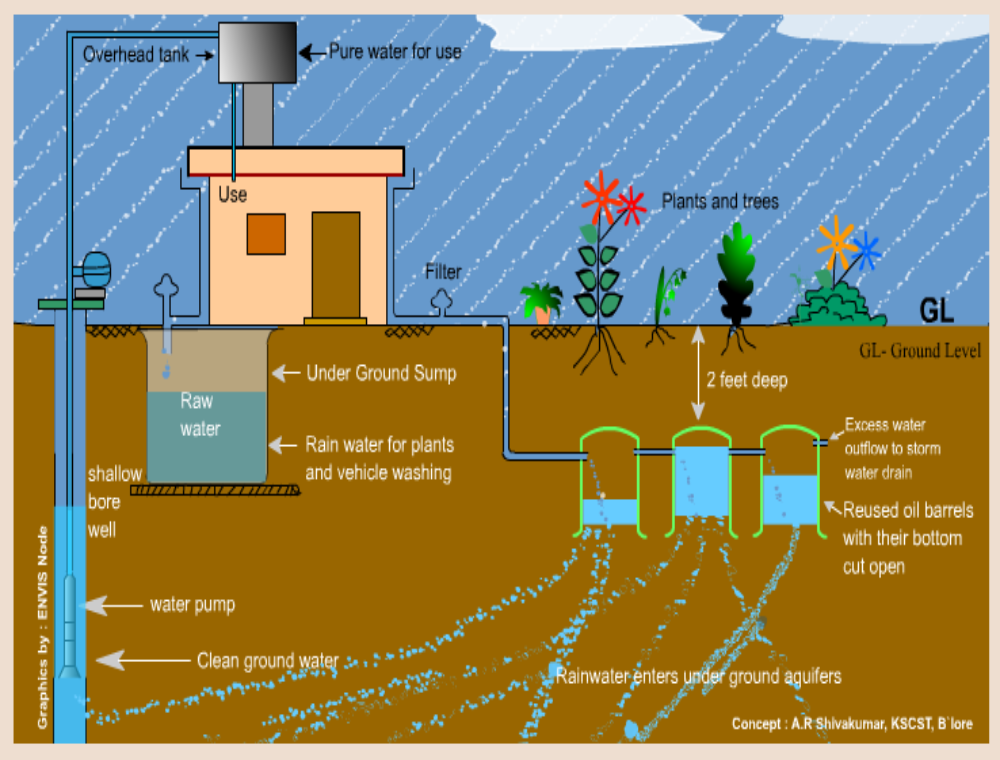
5. Retention Ponds: Retention ponds are used to collect surface runoff water and improve the quality of water by natural processes like sedimentation, decomposition, solar disinfection, and soil filtration. This type of pond normally has a mud bottom, but in some cases, it may be lined with concrete. The most common use of water collected and harvested by pond harvesting is watering livestock, however, it can also be used for groundwater recharge, irrigation or any other purpose other than potable uses.
These can be costly, unsightly, and use a significant amount of space. Retention ponds are a cost-only method of stormwater retention and provide little in gain, including the unfortunate migration of more mosquitoes into the area. There are retention ponds that have been made to add a pleasant view to the property, but to do this costs even more. Most developers try to hide retention ponds the best they can.

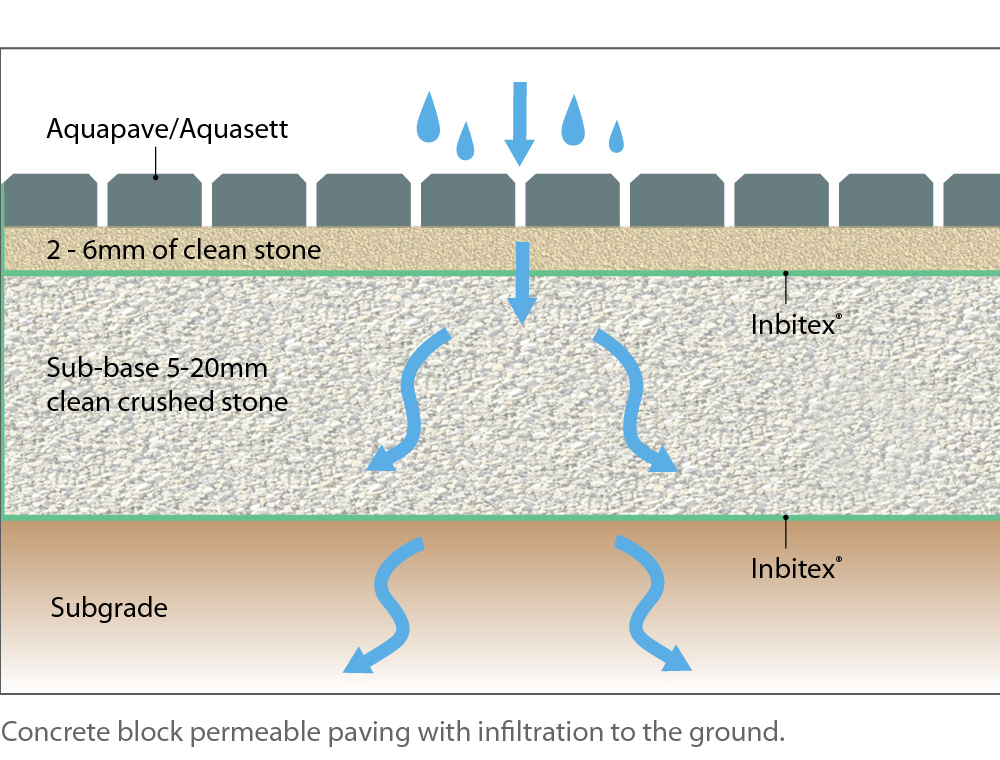
6. Permeable Pavers: A Permeable Pavement stormwater runoff system stores water by allowing stormwater runoff to infiltrate through porous surfaces into a storage reservoir. This method of stormwater runoff harvesting utilizes a free resource to reduce municipal water supply costs, while complying with regional stormwater management guidelines.
In southern climates, a NO INFILTRATION system (complete with liner) can be used as the long term storage reservoir, with the water being used for irrigation, washing or other non-potable applications. An integrated control system, is typically used to operate these harvesting systems. In addition, where the system is also serving a stormwater management function, it is recommended that an active control system be used to monitor weather forecast information and to automatically draw down the water volume to accommodate projected precipitation rates.
This can be a very costly way of retaining stormwater. And again, it is a cost-only method that can provide little benefit other than the retention itself. Permeable pavers can be made to be a beautiful addition to the landscape of a property. This, of course, comes with a price.
After learning all available harvesting methods, the next step will be setting up a working system.
Well-designed rainwater harvesting systems ensure that the pipes and all other openings are insect-proof, especially in wet systems. Additionally, wire mesh screen covers on all tank inlets can help prevent debris from entering the tank. Collection surfaces (mainly roofs) should be made of nontoxic materials, particularly avoiding lead-based paints and membranes, and tanks should be made of nontoxic and noncorrosive material. Care should be taken to ensure that the tank outlet taps or draw-off pipes are at least 10 cm (4 inches) above the tank floor to avoid drawing out any sludge that may have collected in the water supply. Although some systems have a sump pump and washout pipe to remove sludge, regular cleaning of the inside surfaces of the tank is recommended for all systems.
Additionally, catchments should be kept clean of accumulations of dirt, moss, lichens, and other debris. Trees branches that overhang those catchment surfaces should be cut back. Regular cleaning of gutters, tank inlets, and screens and annual tank inspection are necessary for proper functioning. Ideally, the water should be tested periodically to monitor its quality.
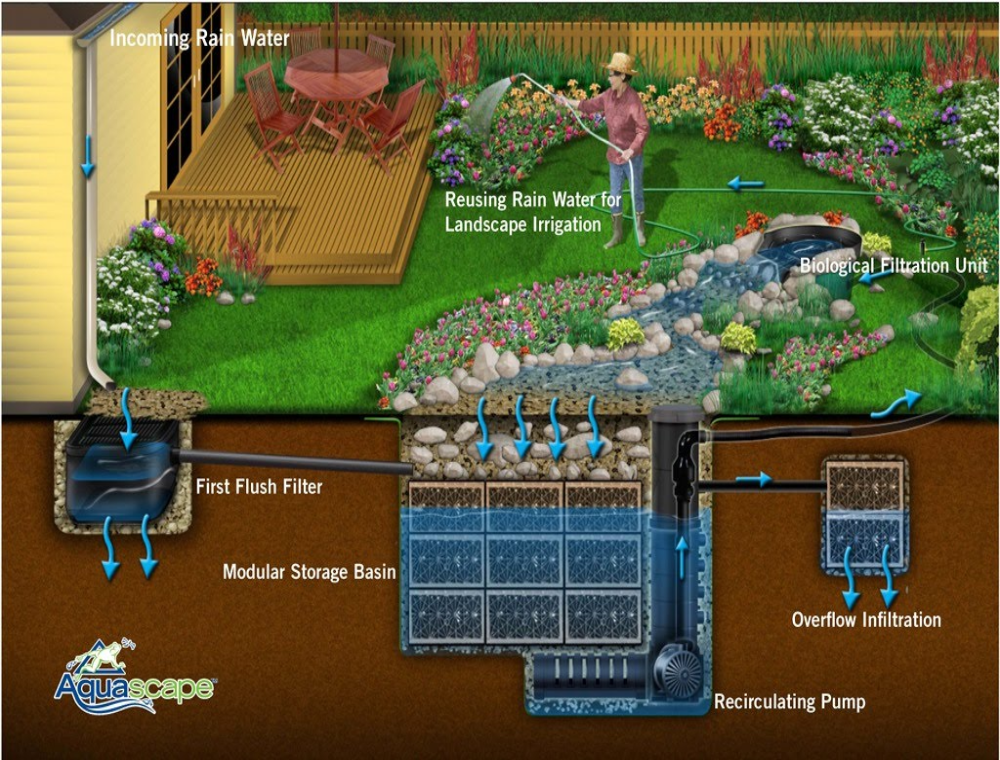
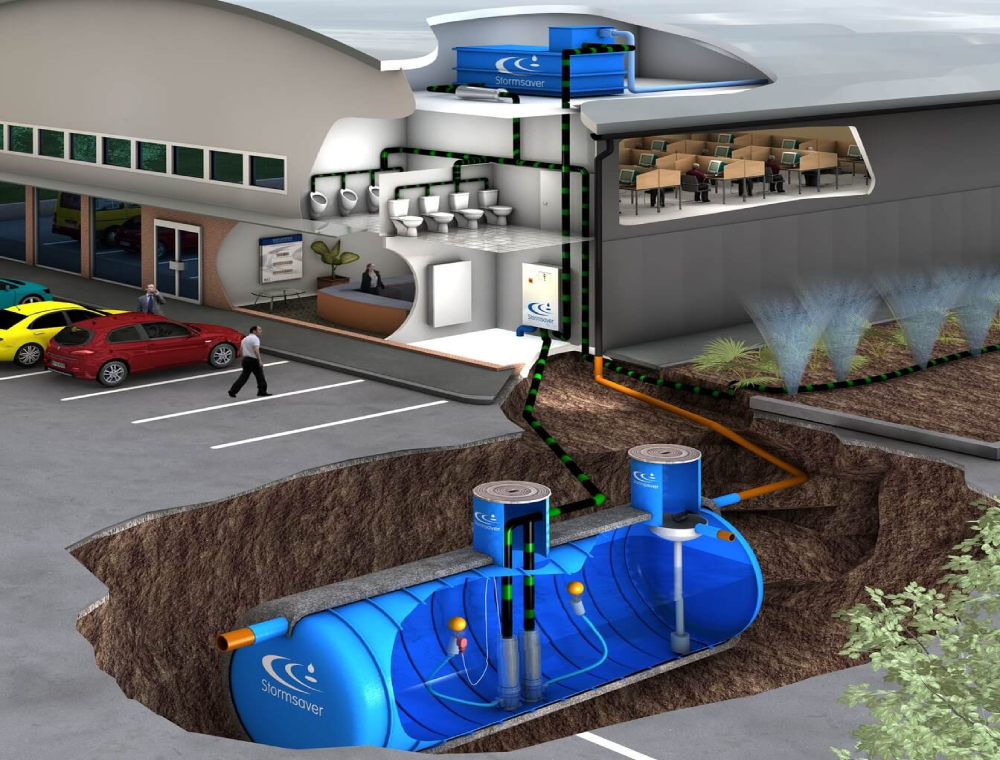
A complete harvesting system example/model
The first component of every rainwater harvesting system is the catchment area. Rooftops provide a hard surface that is separated from the debris that are found on ground surfaces. For instance, dirt, gravel, animals, cars, oil, and many others are common on the ground. This is why collecting rainwater from a paved driveway requires a much more intense filtration process. Roofs, on the other hand, are generally only exposed to a few contaminants which are easily filtered and removed.
The type of roof does matter. Generally, roofs such as tin, slate, and rubber are excellent for a rainwater harvesting application. Roofs that will release more contaminants into the water can cause problems. What about shingles? There are certain types of shingle roofs that approved to use, but make sure to talk with a rainwater harvesting professional before making your decision.
The next step in the rainwater harvesting process is diverting the rain from the rooftop into the rainwater storage vessel. There are two primary methods of diversion:
Below-Grade Storage: Water flows from the downspouts and into underground conveyance where it is gravity fed into the storage.
Level or Above-Grade Storage: In the case where the water storage is on grade or even a little above where the downspouts end, a wet-conveyance system is needed. Many homes today use a wet-conveyance system. They require the downspouts be replaced with sealed conveyance. Therefore, as the water fills up the conveyance, gravity will push the water into the storage. The conveyance can then be painted or covered to match the exterior design.
After the downspouts, the conveyance is placed underground all the way to the storage.
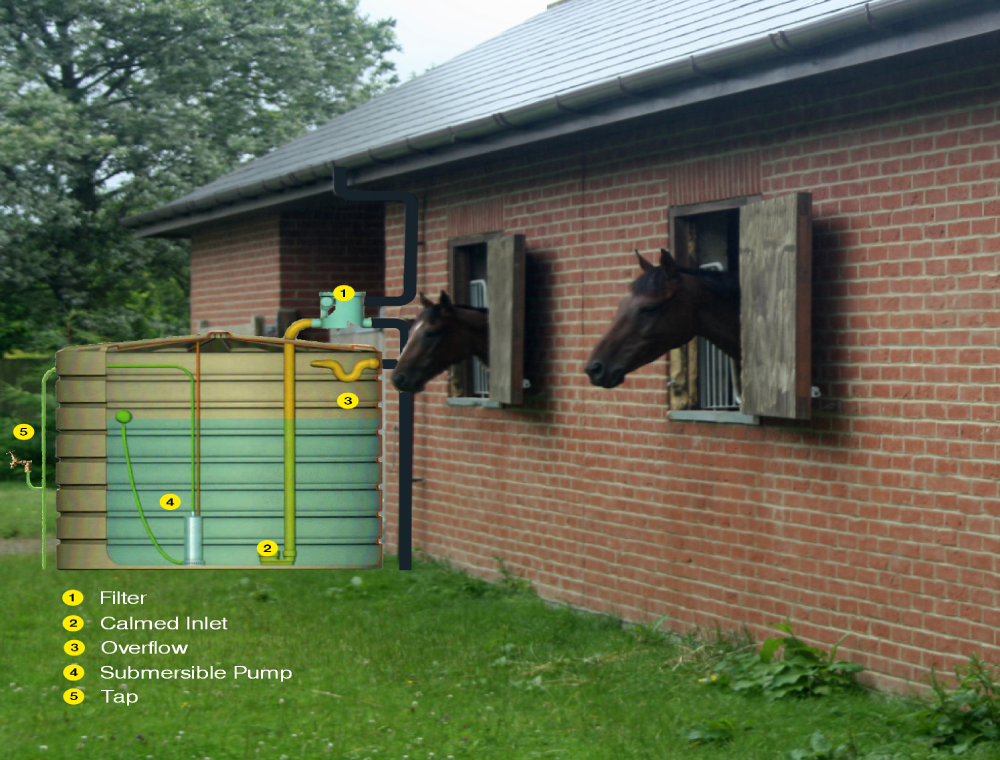
Before entering the rainwater storage vessel, the water is sent through a robust pre-storage filter. This pre-filter has two primary functions:
Filtration: The major contaminants that could flow from the roof and through the conveyance such as leaves and other large contaminants are easily filtered out through the filter.
Oxygenation: As the water passes through the filter, it is designed in such a way that highly oxygenates the water, which helps keep the water naturally fresh and pure.
The filter is designed to be very efficient, yet effective.
Most pre-storage filters use a metal mesh filter that is either gravity-fed or filtered through centrifugal force. These filters do not need to be replaced, but rather should be cleaned about 2-4 times per year.
After the water passes through the pre-storage filtration, it is diverted into the water storage. But even this process has been designed to work precisely with the system.
There is a healthy microbiological layer that forms on the bottom of the tank, known as the biofilm, and it helps keep the water clean. And to make sure that this layer is not disrupted, when entering the storage, water goes through a smoothing inlet. This sends the water into the tank in an upward motion, rather than forcing water to the bottom.
Rainwater storage can be placed below ground, above ground, or partially buried. The benefits of being above ground or partially buried are the cost is usually less, and you can also use the storage as a part of your landscape design. While the benefits of below ground storage are that the storage is completely out of site, but the cost of excavation will generally bring the overall price up.
There are many different types of tanks. The most common are above and below ground polyethylene, and above ground metal tanks. It is important to make have high tank quality, it needs to be U.V. resistant and designed for potable water use.
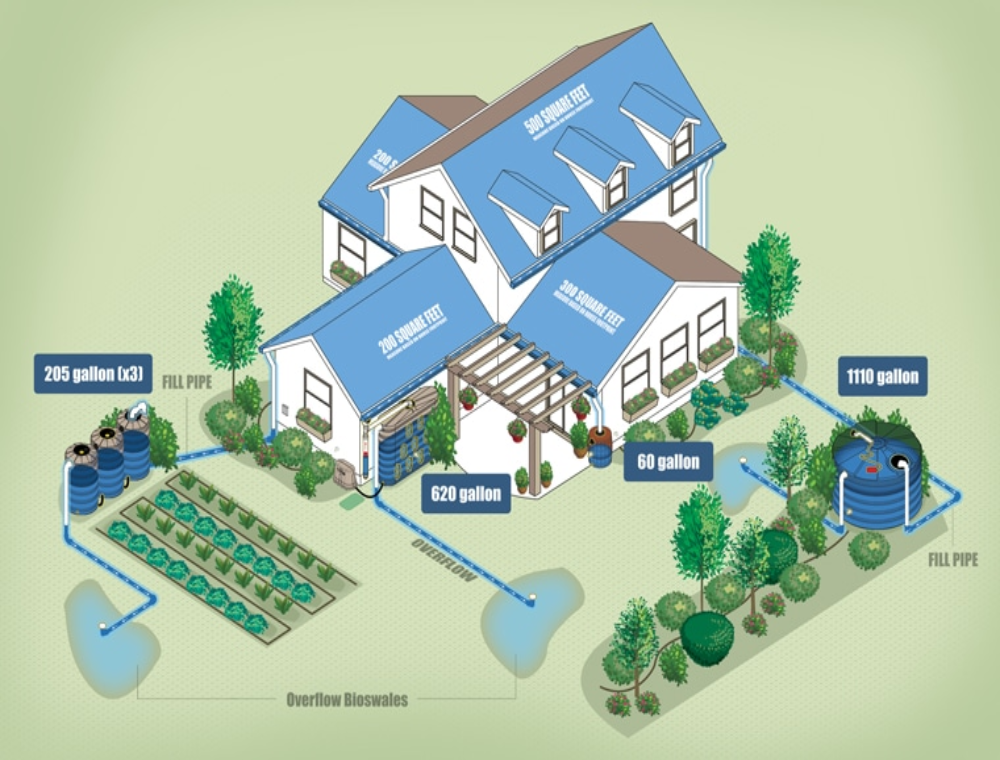
The amount of storage is completely based on the application. Most residences will fall somewhere between 3,500 gallons and 10,000 gallons of water storage. Often times, storage is placed in series, such as five 1,300 gallon tanks.
When the water in storage is filled to the top, it sent out through an overflow device. This is specially designed to let the water flow out, without compromising the inside of the tank to any outside sources. This water can be diverted into an animal water trough, a pond, or can be sent into groundwater recharge.
Every rainwater harvesting system includes a pump. There is little strain put on the pump compared to a well because the water isn't directly fighting gravity for hundreds of feet. Rather, the pump is simply mounted inside the water storage tank.
And using a floating mesh water intake, it draws the water from about 4 inches below the surface where it is best. The water is then pumped out of the tank and sent to the filtration panel. The pump should be high-quality and robust, but should the pump ever be damaged, or need to be replaced, it is a quick job to replace the pump since it is very accessible.
It is not only important how the water enters the tank, but also how it exits. Using a floating filter intake, the water passes through yet another filter on its way out of the tank. It is collected just a few inches under the surface, where the water is at it's best.
Due to the water already being very clean, three simple stages of filtration and disinfection are needed to make certain the water is 100% safe to drink. The water is sent through a sediment filter that removes any remaining particles. And then through a carbon filter that removes other contaminants and makes the water fresh and taste great. And finally, the water is sent through an ultraviolet disinfection system. This removes any possible bacteria from coming through the water. The filters only need to be changed once or twice per year.
Controls such as water storage level indicators can be used. Pressure readings are also common.
The filtration and controls panel can often be placed on a wall using a 3ft x 3ft panel, so it doesn't take a lot of space.
This is a great way to calm any nerves of ever running out of water. The system can be tied into a municipal or well water supply that can be automatically switched on in case of a drought. If this is used with municipal water supply, backflow prevention is required.
The water has now made it through the final part of the rainwater harvesting system process. The rainwater should be tied in directly to the house plumbing.
It is ready to use!
At the beginning of the rainy season, don't start harvesting rainwater rightaway, wait for a 15-20 minutes rain to wash away dirt or any other contaminants in the air and your rooftop. It is necessary to clean the storage tanks, collecting devices and carefully cover them to avoid the spread of contaminants. Furthermore, in the use of rainwater for daily life, it is not recommended to use raw rainwater, there might be harmful matters that cannot be seen commonly which will affect you without doubt. We highly recommend filtering before use.
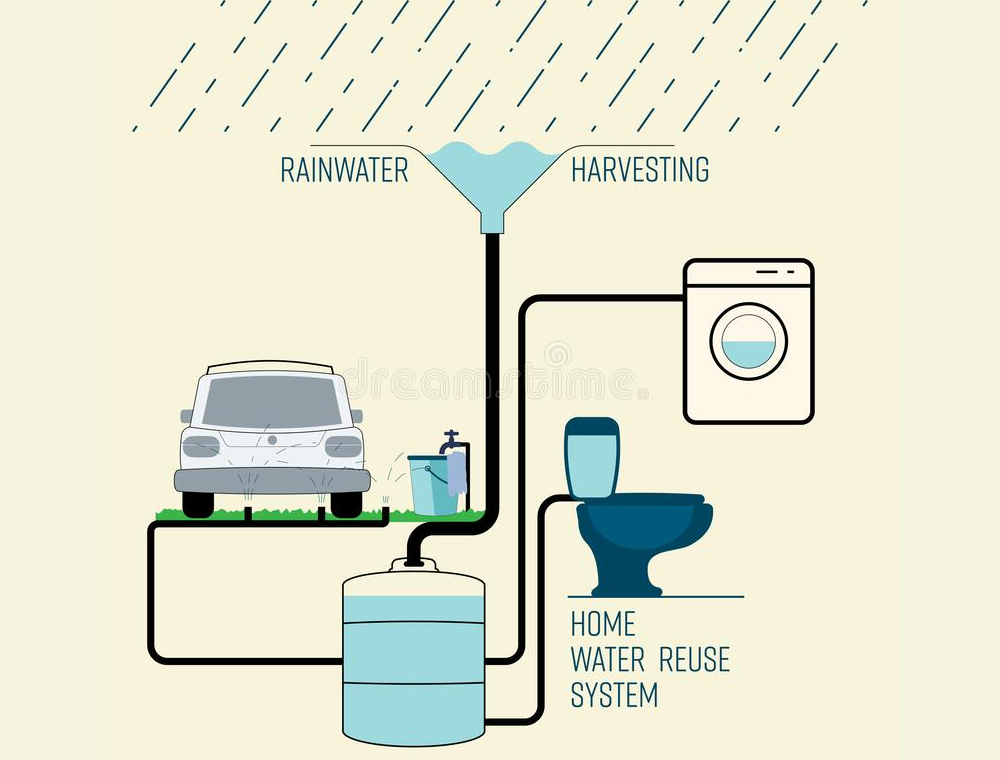
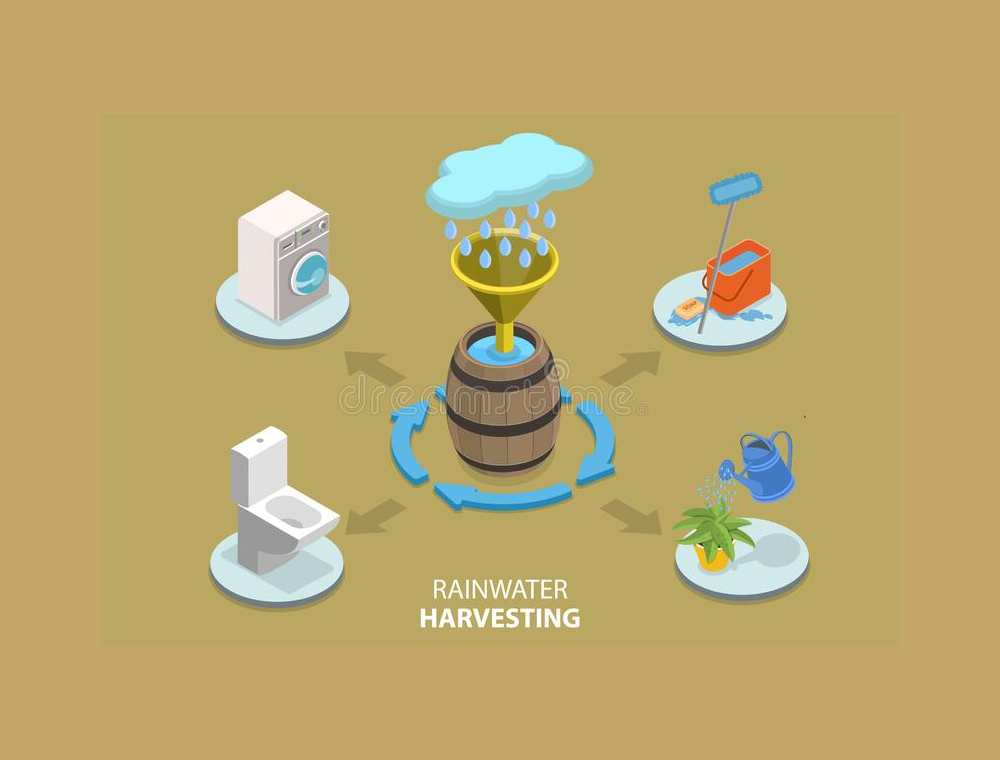
There are basically three areas where rainwater can be used:
Here are some ideas for specific uses of rainwater:
Rainwater harvesting is something that thousands of families across the world participate in, and you could be the next to enjoy the multitude of benefits offered with rainwater harvesting.
It is an easy, simple and worthwhile process, so it is only in your best interest to take a look at rainwater harvesting and its benefits to your home. It is the answer for many wondering how they will have a sustainable water supply for their home. It may be the most influential force that helps our nation's freshwater supply in water conservation.
You may discover many surprises and things that you did not know along the way. Take control of your water.